
Tutorial
Learn how to create pages, edit the menu, use tags, etc.
Online Support for Your Site:
- Basic guide for all Voices sites.
- Useful tutorials on Divi specific design and content.
General UChicago Voices Information
In Person Support at the TECHB@R
Regenstein Library – 1st Floor
Voices Support (Wednesday: 2pm – 5pm)
IT Services (Monday – Thursday: 9am – 6pm; Friday: 10am – 5pm)
Email Support: voices_sites@lists.uchicago.edu
How to Create Pages
To create a New Page go to the Pages link in your dashboard and select Add New. On the right side of the editor page there is a column entitled Page Attributes. If you are creating a stand alone page, select No Parent and the Default Template. If you would like your new page to be nested beneath another page, you can select a parent page. You can also do this after creating the page through the Menu link in your dashboard.
The main difference between pages is how you choose to design them and what modules you include. For a static page, you will include modules with stable content. You may also include feeds to updating content in a static page, such as a Twitter or Blog feed. However, setting up a Blog Page is slightly different.
To create a Blog Page, insert a Blog Module into a static page. You can customize your blog feed by editing the module (number of posts per page, post visibility, comment restrictions, etc.). There is also a separate Posts link in the dashboard where you can manage all of the posts in your Blog Feed. Any new blog post made to your site will feed into the blog modules on your site. Additionally, you may want to include a Sidebar Module in your Blog Page, which includes features such as a search bar, blog archive, tags and categories, etc. You can see an example of a Blog Page by visiting the News Page.
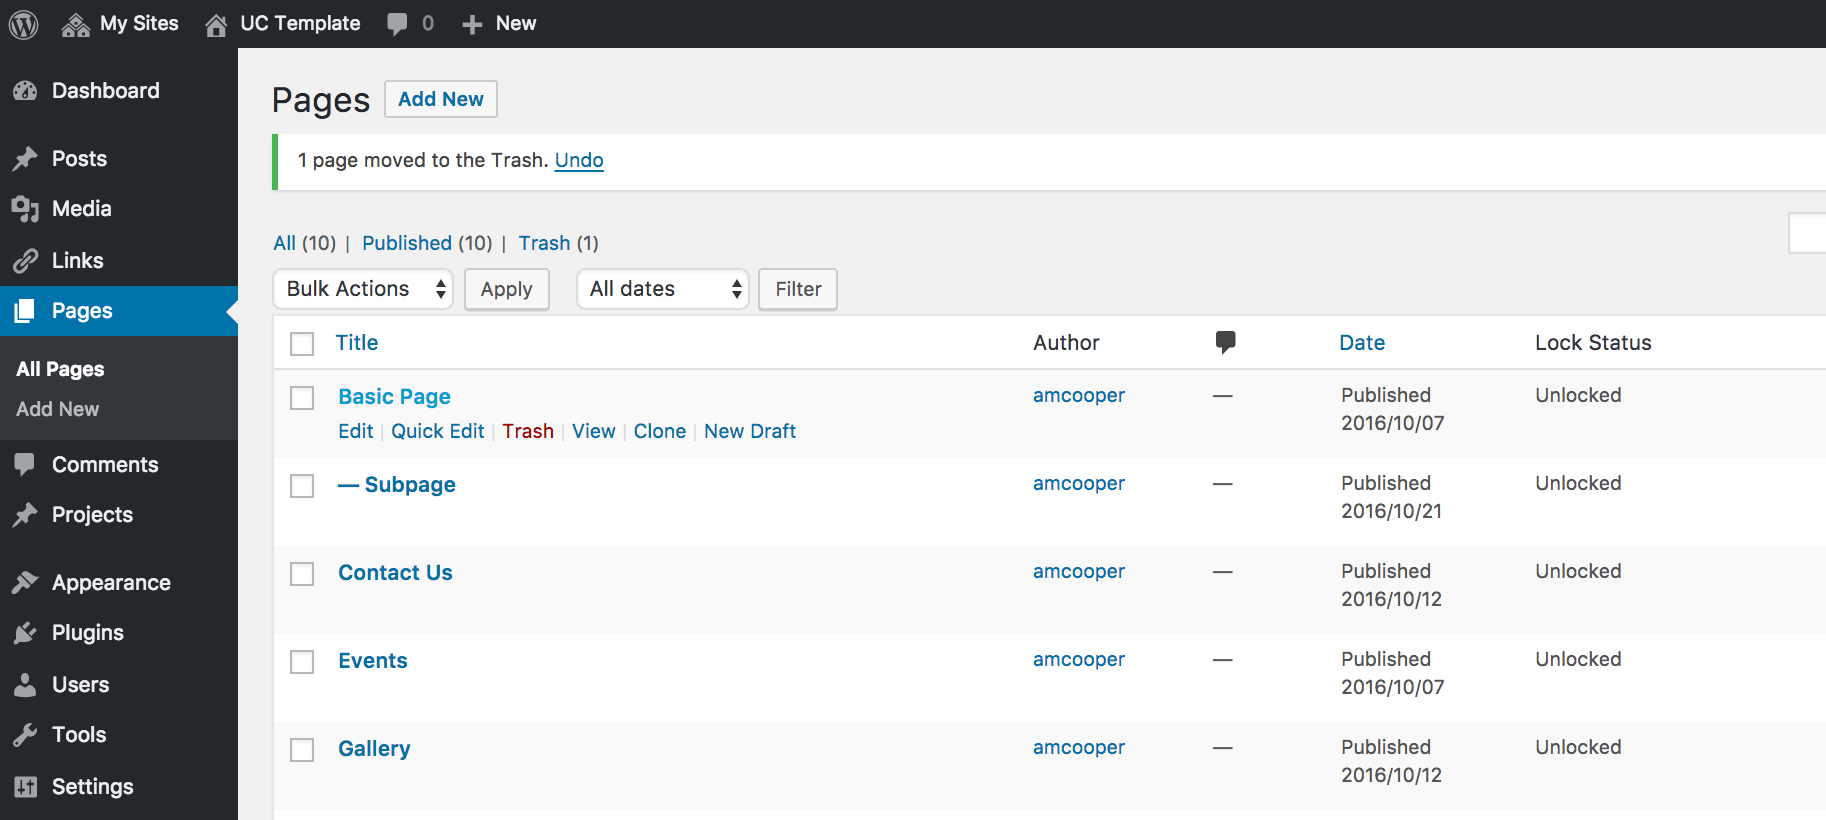
How to Copy/Clone Pages
If you’d like to create a copy/clone of a page, go to the Pages link in your dashboard. There you will see a list of all site pages. Hover over the page you’d like to copy, and select the Clone option. The new page will appear in your Pages menu as page name – draft, for example: Basic Page – draft.
Creating and Editing Menus
The menu at the top of your site allows visitors to navigate to the main pages on your site, however only pages that have been added to the menu will appear there. Additionally, we recommend that top level navigation be seven items or less. To add pages to your navigation go to Appearance > Menu, and select Homepage (Primary Menu) from the Select a Menu to Edit option and click Select.
Select the pages you wish to add to the menu from the “Pages” section on the left. Once the pages are added, reorder them under the Menu Structure and then Save Menu. You can create Subpages, which will appear in a dropdown menu from your main navigation pages, by dragging pages underneath and to the right of parent pages in this menu. They will then read “Sub Item.”
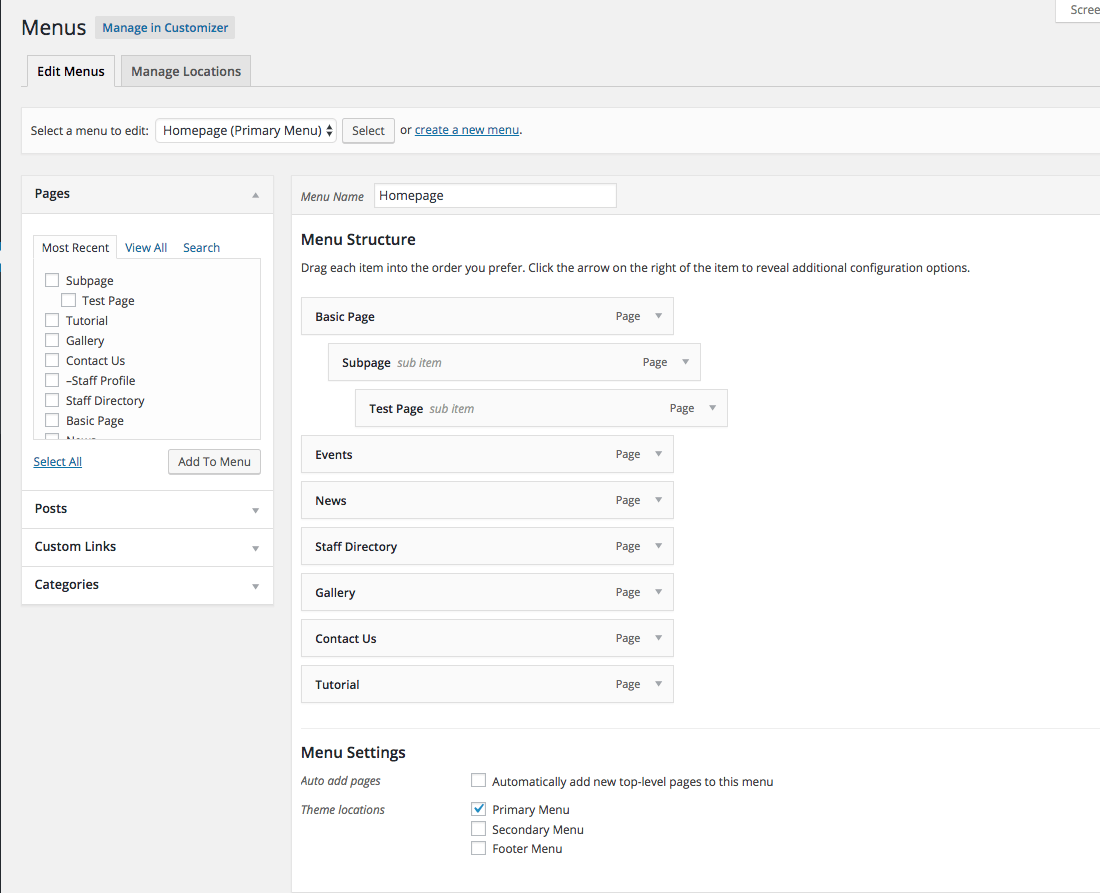
In order to remove pages from the menu (such as this Tuturial Page), go to the Menu Structure window, click on the page you wish to remove (by clicking on the down arrow to the right), and select Remove. Remember to save any changes you make to the menu.
You can have up to 3 layers of navigation in your site, but you should not have more than two menus directly on top of one another. To create a secondary menu go to the dashboard, then select Appearance > Customize > Menus > Add Menu. You will be able to choose whether your menu appears on the top or bottom of the page.
To create a utility navigation in the top right corner of the site, go to your dashboard and select Appearance > Menus. Next to “Select a menu to edit,” select the “BLANK_NONMENU.” You can then add and save pages to this navigation in the same manner as the main navigation.
Dropdown Navigation
Dropdown functionality is enabled by default, but this can be turned off. Learn how to change the main menu options here. You can also disable the main menu items as links. Note that “Number of dropdown tiers shown – This options allows you to control how many tiers your pages dropdown menu has. Increasing the number allows for additional menu items to be shown.”
Using Tags and Categories in Blog Feeds
The easiest way to add tags and categories to a blog post is in the dashboard. Select a post and go to the menu on the right of the screen. You will see a menu for Categories and Blog Post where you can type in the categories and tags you prefer. If you are using a category for the first time you will need to Add Category. If you have included a Sidebar in your Blog Page, these categories and tags will appear there and allow page veiwers to navigate your Blog Page for specific content.
If you choose to create a Blog Feed from your central Blog on another page (for example a News feed in your Homepage), you can choose to feed all posts or only posts within specific categories.
Editing the Header
The default setting for your Voices header is to have your logo or department signature system centered over the navigation. This layout allows for maximum flexibility to your navigation without interference or spacing issues with your logo.

There are other layout options available to you. You may choose to have your logo/signature system to the left of the navigation. If you would prefer this option, please be aware of its limitations. The most important being that the navigation system (language) will need to be succinct. If your navigation is complicated, it will be necessary to go with the default centered approach.

If your navigation system (language) is just on the verge of being too long but you would like to try to keep your logo oriented on the left, you can make your navigation full width. Go to your dashboard, then select Appearance > Customize > Header & Navigation > Primary Menu Bar. Select Make Full Width and save your changes.
Editing the Logo
In order to replace the logo at the top of the screen, go to your dashboard and select Divi > Theme Options > General > Logo. Once you have uploaded a new logo remember to Save Changes. It is recommended you use a SVG file format, since this will allow your image to scale up and down without losing image quality.
To edit the scale of your logo, you will need to adjust the height of your menu. Go to your dashboard and select Appearance > Customize, then select Header & Navigation > Primary Menu Bar. Here you can increase (or decrease) your Logo Max Height and Menu Height until you find the proportions that you prefer.
Editing the Footer
The footer in this template consists of 3 columns. The first column contains a UChicago Logo and the option to include email and phone contact information. You can also include office or department hours or an address. If you are comfortable editing code, you can access this column of the footer through your dashboard. Otherwise, you can reach out to Voices support at the Techb@r Tuesday and Thursday (1:30 – 5:00 PM).
The second and third columns are Footer Menus. You can edit the content in these Footer Menus through the dashboard. Select Appearance > Customize > Menus. There will be a Footer Menu 1 and Footer Menu 2. Select a menu and you will see all of the pages linked to that menu. You can add pages or remove them by selecting the Add Items and Remove buttons. Remember to Save and Publish when you have finished.
If you want to remove a menu entirely, go to your dashboard and select Appearance > Customize > Widgets. Select the Footer area you want to remove entirely and select Remove.
Editing Site Name
The name of your site can be edited by editing the Global Library item called, “Site Name”. To access the Library, go to Divi > Divi Library > Site Name. From there you can edit the name by editing the “Text” module. When creating new pages, it is necessary to add this new Library item to your page first. Choose the “Add from Library” option and ensure it is the top item in the builder.
Adding Users
To grant authoring access to individuals yourself, ask them to go to voices.uchicago.edu and log-in with their CNetIDs. Then go to your blog’s Dashboard > Users > Add New. Under Add Existing User, enter the individuals’ CNetIDs. (Do NOT use Add New Users, as users will not be able to log-in with their CNetID and password.) View a comparison chart of the 5 possible roles.
Making your Site Live
To launch your site, go to Settings > Reading > Site Visability and select Allow search engines to index this site. The url that you when creating the site (voices.uchicago.ed/NAME) will be the url for the site.
If you’d like to set up a NAME.uchicago.edu redirect to your voices site (voices.uchicago.ed/NAME), please send your request to voices_sites@lists.uchicago.edu for approval. Use the following format:
“Hello, I’d like to request that NAME.uchicago.edu redirect to voices.uchicago.ed/NAME. Thank you!”
Once your Vhost is approved, IT Services will set up the redirect for you.
Image Size Requirements
Homepage Slider
Feature Background Image: 1600px wide by 750px tall
Feature Focus Image: 600px tall by OR wide
Sections
Background Image (Fade): 1600px wide by 900px tall
News/Blog
News (Blog) Feature Image: 900px wide by 500px tall
Profiles
Profile Image: 600px wide by 600px tall
Header Image: 1600px wide by 600px tall
Media File Size Limitations
There is a limit of 50MB per file when uploading to the Media folder. If your file size is larger than 50MB, we would suggest using Box (https://uchicago.account.box.com/) hosting your files and linking to them there. If you’re attempting to upload a video file that is too large, you can use YouTube to host the video and then link to the YouTube url.